Cloud Database

Unlock the power of flexible, secure, and scalable cloud database solutions for your business.
Cloud Database
Advanced Scalability
With Hostman Cloud Database, you can effortlessly scale your databases up or down to match your workload demands. Our cloud-based database solutions ensure that you can handle sudden traffic spikes without compromising performance, providing seamless growth for your applications.
Enhanced Security
Security is a top priority at Hostman. Our cloud database security measures include advanced encryption, regular security audits, and stringent access controls. Your data is protected against unauthorized access and potential threats, ensuring peace of mind.
Easy Integration
Integrate additional resources and services with ease using Hostman Cloud Database. Whether you need to expand storage, add new applications, or connect to third-party services, our platform supports seamless integration, enabling you to enhance your capabilities effortlessly.
In-house tech support
Enjoy 24/7 technical support with Hostman Cloud Database. Our dedicated support team is always available to assist you with any issues or questions, ensuring that your database operations run without interruptions.

Tailored database solutions for every need

Versatile capabilities and distributions.

MySQL

Streamline app development with our fully managed MySQL environments, designed for optimal performance and scalability.

PostgreSQL

Unlock the power of PostgreSQL. We manage the details: you harness its advanced capabilities for your data-driven solutions.

Redis

Accelerate with managed Redis. Blazing-fast data handling, zero management overhead — all in your control.

MongoDB

Flexible, dynamic MongoDB management lets you focus on innovation while we handle the data agility your app needs.

OpenSearch

Managed OpenSearch powers your insights. We handle the complexity, you enjoy lightning-fast, scalable search capabilities.

ClickHouse

Instant analytics with managed ClickHouse. Fast, reliable, and maintenance-free — query at the speed of thought.

Kafka

Effortless data streaming with Kafka. Our management means reliable, scalable, real-time processing for your applications.

RabbitMQ

Seamless messaging with RabbitMQ. Let us manage the queues while you build responsive, interconnected app features.

What is Cloud Database?

A cloud database is a flexible, scalable solution that allows you to store and manage data in a cloud environment. It eliminates the need for physical hardware, offering seamless integration, automated scaling, and strong security measures. With Hostman Cloud Database, you can easily adapt to changing workloads, ensuring your applications run smoothly, even during traffic spikes.

Get started with Hostman
cloud database platform

Don’t let your database slow you down. Choose Hostman
for reliable, scalable cloud database solutions that
grow with your business.

Transparent pricing for your needs and predictable pricing

MySQL
New York
1 x 3 GHz CPU
CPU
1 x 3 GHz
1 GB RAM
RAM
1 GB
20 GB NVMe
NVMe
20 GB
200 Mbps Bandwidth
Bandwidth
200 Mbps
$4
 /mo
2 x 3 GHz CPU
CPU
2 x 3 GHz
2 GB RAM
RAM
2 GB
60 GB NVMe
NVMe
60 GB
200 Mbps Bandwidth
Bandwidth
200 Mbps
$9
 /mo
2 x 3 GHz CPU
CPU
2 x 3 GHz
4 GB RAM
RAM
4 GB
80 GB NVMe
NVMe
80 GB
200 Mbps Bandwidth
Bandwidth
200 Mbps
$18
 /mo
4 x 3 GHz CPU
CPU
4 x 3 GHz
8 GB RAM
RAM
8 GB
160 GB NVMe
NVMe
160 GB
200 Mbps Bandwidth
Bandwidth
200 Mbps
$36
 /mo
6 x 3 GHz CPU
CPU
6 x 3 GHz
16 GB RAM
RAM
16 GB
320 GB NVMe
NVMe
320 GB
200 Mbps Bandwidth
Bandwidth
200 Mbps
$72
 /mo
8 x 3 GHz CPU
CPU
8 x 3 GHz
32 GB RAM
RAM
32 GB
640 GB NVMe
NVMe
640 GB
200 Mbps Bandwidth
Bandwidth
200 Mbps
$114
 /mo
16 x 3 GHz CPU
CPU
16 x 3 GHz
64 GB RAM
RAM
64 GB
1280 GB NVMe
NVMe
1280 GB
200 Mbps Bandwidth
Bandwidth
200 Mbps
$288
 /mo

One panel to rule them all

Easily control your database, pricing plan, and additional services
through the intuitive Hostman management console.
Easy set up and management
Ready-to-deploy cloud database solutions come pre-configured. Choose your setup, launch your database, and begin managing your data with ease.
Saves time and resources
Forget about configuring hardware and software or manual database management—our service has it all covered for you.
Security
Deploy databases on an isolated network to maintain private access solely through your own infrastructure.
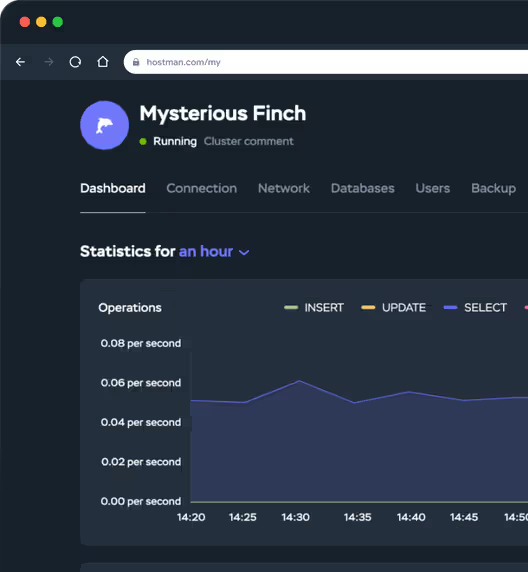
Hostman management console, statistics for an hour
Anup k.
Associate Cloud Engineer
5.0 out of 5

"Hostman Comprehensive Review of Simplicity and Potential"

It been few years that I have been working on Cloud and most of the cloud service...
Mansur H.
Security Researcher
5.0 out of 5

"A perfect fit for everything cloud services!"

Hostman's seemless integration, user-friendly interface and its robust features (backups, etc) makes it much easier...
Adedeji E.
DevOps Engineer
5.0 out of 5

"Superb User Experience"

For me, Hostman is exceptional because of it's flexibility and user-friendliness. The platform's ability to offer dedicated computing resources acr...
Yudhistira H.
Mid-Market(51-1000 emp.)
5.0 out of 5

"Streamlined Cloud Excellence!"

What I like best about Hostman is their exceptional speed of deployment, scalability, and robust security features. Their...
Mohammad Waqas S.
Biotechnologist and programmer
5.0 out of 5

"Seamless and easy to use Hosting Solution for Web Applications"

From the moment I signed up, the process has been seamless and straightforward...
Mohana R.
Senior Software Engineer
5.0 out of 5

"Availing Different DB Engine Services Provided by Hostman is Convenient for my Organization usecases"

Hostman manages the cloud operations...
Faizan A.
5.0 out of 5

"Hostman is a great fit for me"

Hostman is a great fit for me. What do you like best about Hostman? It was very easy to deploy my application and create database, I didn't have
Adam M.
5.0 out of 5

"Perfect website"

This website is extremely user friendly and easy to use. I had no problems so didn't have to contact customer support. Really good website and would recommend to others.
Anup K.
4.0 out of 5

"Simplifying Cloud Deployment with Strengths and Areas for Growth"

What I like best about Hostman is its unwavering commitment to simplicity...
Naila J.
5.0 out of 5

"Streamlined Deployment with Room for Improvement"

Hostman impresses with its user-friendly interface and seamless deployment process, simplifying web application hosting...

Compare Hostman Cloud Database with leading providers

Discover how Hostman stands out against other top cloud database providers in terms of pricing, support, and features.
Hostman
DigitalOcean
Google Cloud
Vultr
Price
From $4/mo
$6
$6.88
$5
Tech support
Free
$24/mo
$29/mo + 3% of
monthly charges
$29/mo or 3% of
monthly charges
Backups
from $0.07/GB
20% or 30% higher
base daily/weekly fee
$0.03/GB per mo
20% higher base
monthly/hourly fee
Bandwidth
Free
1 TB Free further $0.01/GiB additional transfer
$0.01 per GB
$0.09/GB first
10 TB / mo
Live chat support
Avg. support response time
<15 min
<24 hours
<4 hours
<12 hours

Ready to get started?

Sign up and discover how easy cloud database
management can be with Hostman.

Start turning your ideas into solutions with Hostman products and services

See all Products

Trusted by 500+ companies and developers worldwide

Global network of Hostman's data centers

Our servers, certified with ISO/IEC 27001, are located in Tier 3 data centers across the US, Europe, and Asia.
Hostmans' Locations
🇺🇸 San Francisco
🇺🇸 San Jose
🇺🇸 Texas
🇺🇸 New York
🇳🇱 Amsterdam
🇳🇬 Lagos
🇩🇪 Frankfurt
🇵🇱 Gdansk
🇦🇪 Dubai
🇸🇬 Singapore

Explore more of Hostman cloud databases

Python

How to Install pip on Windows

pip is a utility that turns Python package installation and management into a straightforward task. From Python beginners to coding wizards, having this utility on your Windows computer is a true game-changer. It effortlessly facilitates the setup of crucial frameworks and libraries for your development needs. Automating package management with pip frees up your time and reduces the complications linked to manual installations. Follow this guide to become proficient in configuring pip and overseeing your Python packages seamlessly. pip Setup Process for Windows Here are the guidelines to set up pip on a Windows machine. Step 1: Confirm Installation Verify Python is operational on your device before starting the pip setup. To carry out this operation, run command prompt and apply: python --version   If Python's not present on your system, download it from the official site. Step 2: Download get-pip.py Python's standard installation package automatically includes pip. However, in case of accidental removal, grab the get-pip.py script.  You have a couple of options: either visit the pip.py webpage, or use the curl command for a quick install: curl https://bootstrap.pypa.io/get-pip.py -o get-pip.py Note: Installing Python again to get pip is also an option. However, it can sometimes lead to conflicts with other dependencies or settings. Your existing Python setup stays unchanged with this script. Step 3: Run get-pip.py Move to the script’s location through the command prompt and apply: python get-pip.py This will smoothly install pip on your device. Step 4: Confirm pip Installation Validate the installation by executing: pip --version Applying this command ensures pip is installed on the system. Step 5: Add pip to System PATH If the command doesn't execute properly, update your system PATH with these instructions to incorporate pip: Access Properties by right-clicking on My Computer or This PC from the drop-down menu. Opt for Advanced system settings. Select Environment Variables. Head over to System Variables, spot the Path variable, and choose Edit. Insert the Python Scripts directory into your system PATH, for example, C:\Python39\Scripts. Alternative Ways for pip Installation on Windows Let's discuss a few other ways to effortlessly get pip running on Windows. Via Built-in ensurepip Module From Python 3.4 onward, there's an awesome built-in module named ensurepip. With this tool, pip installation is simplified, eliminating the need for the get-pip.py script. Step 1: Run ensurepip Input the command below to set up pip: python -m ensurepip --default-pip Step 2: Verify pip Installation Check pip version through: pip --version Python Installer Approach for pip Installation Ensure the pip checkbox is marked during the Python setup. Here's how: Step 1: Download Installer Fire up your favorite browser, go to the official Python website, and acquire the most recent installation file. Step 2: Launch the Installer Launch the installer you've downloaded and remember to pick the Add Python to PATH option while setting up. Step 3: Install pip While progressing through the setup, don't forget to enable the Install pip option. Step 4: Validate pip is Installed When the setup wraps up, check pip installation via: pip --version Adjusting pip Version: Upgrade or Downgrade pip can be adjusted to suit your requirements by upgrading or downgrading. Here's how: Upgrading pip To give pip a fresh upgrade, execute: python -m pip install --upgrade pip Downgrading pip To roll back pip, apply: python -m pip install pip==<version> Enter the desired version number to install instead of <version> (e.g., 21.0). Resolving pip Installation Issues: Essential Commands Let's discover common pip installation issues and their fixes: Issue 1: "pip" is not recognized as an internal or external command Solution: This implies the pip path isn't set in your system PATH. Simply follow the instructions in "Step 5" to fix this. Issue 2: Permission Denied Solution: Elevate your command prompt privileges by right-clicking the Command Prompt icon and choosing Run as administrator. Afterward, rerun the commands. Issue 3: Missing Dependencies Solution: Sometimes, you'll run into trouble because of missing dependencies. To correct this, manually install the essential dependencies with pip. For example: pip install package_name Swap out package_name for the appropriate dependency. Utilizing Virtual Environments Employing virtual environments keeps dependencies distinct and avoids any conflicts. Here's how to utilize a virtual environment with pip: Creating a Virtual Environment python -m venv env_name Replace env_name with your desired environment name. Initiating Your Virtual Environment env_name\Scripts\activate Standard pip Commands To explore pip's usage, check these essential commands: Installing a Package pip install package_name Modify package_name to accurately reflect the package you're aiming to install. Uninstalling a Package pip uninstall package_name Showing Installed Packages pip list Showing Package Information pip show package_name Optimal Strategies for Package Management Employ virtual environments to handle dependencies efficiently in multiple projects. Regularly inspect and upgrade your packages to keep everything running smoothly. Prepare requirements files to ease the management of dependencies in your projects. Securing pip Installation Ensuring the protection of packages handled by pip is critical. Here are some tips to keep your environment secure: Maintain project isolation to avoid conflicts and secure installations. Check the trustworthiness and verification of package sources before installing. Always refer to official repositories and examine reviews if they are available. Consistently update pip and your packages to stay protected with the latest security patches and improvements. Periodically review your dependencies for known vulnerabilities. Tools such as pip-audit can assist in identifying and resolving security concerns. Adhere to secure coding standards and steer clear of deprecated or insecure packages. Integrating pip with IDEs pip can be effortlessly embedded into various Integrated Development Environments (IDEs), significantly boosting your development efficiency: VS Code: Utilize the built-in terminal for direct pip command and package management within the editor. PyCharm: Streamline package management by setting up pip configurations via the project interpreter. This simplifies the process of installing and managing packages customized to your project's specific needs. Jupyter Notebook: Employ magic commands in the notebook interface for direct package installation. This provides a smooth and integrated experience for managing dependencies while you work on your interactive notebooks.  Conclusion Windows offers several methods to set up pip, catering to different preferences and requirements. No matter if you select the .py script, use Python's built-in ensurepip module, or enable pip during the initial setup, these approaches will make sure pip is properly configured on your system. This all-in-one guide empowers you to handle and install Python packages with ease. Don't forget, keeping pip updated is essential for ensuring the security and efficiency of your Python setup. Routinely check for updates and keep pip upgraded. In addition, on our application platform you can find Python apps, such as Celery, Django, FastAPI and Flask.
15 January 2025 · 6 min to read
Java

Java Date Format

Handling dates and times effectively is a critical aspect of many software applications. In Java, the SimpleDateFormat class from the java.text package offers developers a robust mechanism for formatting Date objects into strings and parsing strings back into Date objects. This guide explores the features, use cases, and best practices for leveraging SimpleDateFormat in your Java projects. Overview of SimpleDateFormat A method for creating unique patterns for date and time data representation is offered by SimpleDateFormat. These patterns are versatile, allowing developers to adapt date formats to their specific application requirements. Here’s an introductory example: import java.text.SimpleDateFormat; import java.util.Date; public class SimpleDateFormatDemo { public static void main(String[] args) { SimpleDateFormat formatter = new SimpleDateFormat("dd/MM/yyyy HH:mm:ss"); Date currentDate = new Date(); System.out.println("Formatted Date: " + formatter.format(currentDate)); } } This sample produces a string that is formatted in accordance with the given pattern and contains the current date and time: Formatted Date: 07/01/2025 14:35:00 Pattern Syntax for Formatting Dates The SimpleDateFormat class employs a symbolic pattern language to precise how dates and times should appear. Below is a table summarizing some key symbols: Symbol Description Example y Year 2025 (yyyy), 25 (yy) M Month 01 (MM), Jan (MMM) d Day of the month 07 (dd) H Hour (0-23) 14 (HH) h Hour (1-12) 02 (hh) m Minute 35 (mm) s Second 00 (ss) a AM/PM marker PM E Day of the week Tue (EEE), Tuesday (EEEE) z Time zone PST (z), Pacific Standard Time (zzzz) d Day of the month 07 (dd) H Hour (0-23) 14 (HH) h Hour (1-12) 02 (hh) m Minute 35 (mm) s Second 00 (ss) a AM/PM marker PM E Day of the week Tue (EEE), Tuesday (EEEE) z Time zone PST (z), Pacific Standard Time (zzzz) Combining these symbols allows developers to create highly tailored date and time formats. Customizing Date Formats Using SimpleDateFormat, you can craft custom formats to suit various requirements. Here’s an example demonstrating three distinct patterns: import java.text.SimpleDateFormat; import java.util.Date; public class DateFormatExamples { public static void main(String[] args) { Date currentDate = new Date(); SimpleDateFormat isoFormat = new SimpleDateFormat("yyyy-MM-dd"); SimpleDateFormat verboseFormat = new SimpleDateFormat("EEEE, MMMM dd, yyyy"); SimpleDateFormat timeFormat = new SimpleDateFormat("hh:mm a z"); System.out.println("ISO Format: " + isoFormat.format(currentDate)); System.out.println("Verbose Format: " + verboseFormat.format(currentDate)); System.out.println("Time Format: " + timeFormat.format(currentDate)); } } Sample Output: ISO Format: 2025-01-07 Verbose Format: Tuesday, January 07, 2025 Time Format: 02:35 PM PST Parsing Strings to Date Objects SimpleDateFormat also facilitates converting string representations of dates back into Date objects. This is especially useful for handling user input or reading data from external sources. import java.text.SimpleDateFormat; import java.util.Date; public class DateParsingDemo { public static void main(String[] args) { String inputDate = "07-01-2025 14:35:00"; SimpleDateFormat parser = new SimpleDateFormat("dd-MM-yyyy HH:mm:ss"); try { Date parsedDate = parser.parse(inputDate); System.out.println("Parsed Date: " + parsedDate); } catch (Exception e) { System.out.println("Parsing failed: " + e.getMessage()); } } } Expected Output: Parsed Date: Tue Jan 07 14:35:00 PST 2025 Incorporating Time Zones The setTimeZone method in SimpleDateFormat allows for explicit handling of different time zones. Here’s an example: import java.text.SimpleDateFormat; import java.util.Date; import java.util.TimeZone; public class TimeZoneHandling { public static void main(String[] args) { SimpleDateFormat formatter = new SimpleDateFormat("yyyy-MM-dd HH:mm:ss z"); formatter.setTimeZone(TimeZone.getTimeZone("UTC")); System.out.println("UTC Time: " + formatter.format(new Date())); formatter.setTimeZone(TimeZone.getTimeZone("America/New_York")); System.out.println("New York Time: " + formatter.format(new Date())); } } Output Example: UTC Time: 2025-01-07 22:35:00 UTC New York Time: 2025-01-07 17:35:00 EST Locale-Aware Formatting The SimpleDateFormat class supports locale-specific date formatting. By specifying a Locale, you can adapt your application for different regions and languages: import java.text.SimpleDateFormat; import java.util.Date; import java.util.Locale; public class LocaleFormatting { public static void main(String[] args) { Date today = new Date(); SimpleDateFormat usFormatter = new SimpleDateFormat("EEEE, MMMM dd, yyyy", Locale.US); SimpleDateFormat frFormatter = new SimpleDateFormat("EEEE, MMMM dd, yyyy", Locale.FRANCE); System.out.println("US Format: " + usFormatter.format(today)); System.out.println("French Format: " + frFormatter.format(today)); } } Output Example: US Format: Tuesday, January 07, 2025French Format: mardi, janvier 07, 2025 Working with Legacy Code For projects that rely on legacy systems, SimpleDateFormat can be instrumental in ensuring compatibility with older data formats. By crafting patterns that match the specific requirements of legacy systems, developers can seamlessly bridge modern and older systems. However, it is critical to perform rigorous testing when working with legacy code. Edge cases like leap years, daylight saving time adjustments, or unusual formats often surface in older implementations. Developers should document the specific formats being used and verify the results using multiple test cases. In certain situations, refactoring legacy systems to use modern libraries like DateTimeFormatter may offer long-term benefits. While it might require upfront effort, the enhanced performance and reduced bug risk in newer libraries often justify the transition. Date Validation Techniques Validating dates is a common requirement in applications that accept user input. With SimpleDateFormat, you can ensure that input strings conform to the expected format before further processing. For example: import java.text.SimpleDateFormat; import java.util.Date; public class DateValidation { public static void main(String[] args) { String dateString = "31-02-2025"; SimpleDateFormat formatter = new SimpleDateFormat("dd-MM-yyyy"); formatter.setLenient(false); try { Date validatedDate = formatter.parse(dateString); System.out.println("Valid Date: " + validatedDate); } catch (Exception e) { System.out.println("Invalid Date: " + e.getMessage()); } } } Output Example: Invalid Date: Unparseable date: "31-02-2025" Using the setLenient(false) method ensures that only logically valid dates are accepted, reducing the risk of errors in downstream processes. Common Pitfalls and Recommendations Thread Safety: Avoid sharing SimpleDateFormat instances across multiple threads. Use ThreadLocal or Java’s DateTimeFormatter for thread-safe alternatives. Error Handling: Always handle potential ParseException errors when parsing strings. ISO Standards: Utilize ISO 8601 formats (e.g., yyyy-MM-dd'T'HH:mm:ss'Z') for better interoperability. Dynamic Time Zones: Refrain from hardcoding time zones; instead, fetch them dynamically when necessary. Input Validation: Before parsing, make sure the input strings have the correct format. Transitioning to Modern Alternatives With the introduction of the java.time package in Java 8, many developers prefer DateTimeFormatter over SimpleDateFormat for its enhanced features and thread safety. import java.time.LocalDateTime; import java.time.format.DateTimeFormatter; public class ModernDateFormatting { public static void main(String[] args) { LocalDateTime currentDateTime = LocalDateTime.now(); DateTimeFormatter formatter = DateTimeFormatter.ofPattern("yyyy-MM-dd HH:mm:ss"); System.out.println("Formatted Date-Time: " + currentDateTime.format(formatter)); } } Sample Output: Formatted Date-Time: 2025-01-07 14:35:00 Additionally, DateTimeFormatter supports advanced features such as optional sections, localized styles, and predefined constants for ISO-compliant formats. These features make it a more versatile and robust choice for modern applications. Final Thoughts SimpleDateFormat remains a practical choice for date and time handling in Java. However, it is essential to understand its limitations, especially in terms of thread safety and modern compatibility. By adopting best practices and considering newer options like DateTimeFormatter, you can ensure robust and efficient date manipulation in your Java applications. Whether you are working with legacy systems, processing user inputs, or developing new features, a thorough knowledge of Java's date formatting features will empower you to handle date and time operations with confidence and precision. In addition, check out our app platform to find cloud apps, such as React, Angular, Vue and more.
15 January 2025 · 8 min to read
Debian

How to Install MySQL on Debian

Installing MySQL on Debian effectively creates a robust and flexible database (DB) infrastructure that accommodates a wide range of applications as well as services. It is renowned for its scalability, dependability, and durability. By setting it, individuals experience the operations in an efficient manner and enhance the overall efficiency of DB infrastructure. This combination is especially beneficial for administrators, DB analysts, and industries that demand a dependable database solution for dealing with huge data. Additionally, MySQL's comprehensive guide and supporters help make it simpler to troubleshoot problems and enhance operations.  In this guide, we will demonstrate the thorough procedure for installing and configuring MySQL on Debian. How to Install MySQL on Debian The default repositories do not contain the MySQL database server package on Debian. To install it on a  Linux system follow the below instructions. We will download the recent version of the MySQL. Step 1: Download MySQL Package Let us obtain the MySQL repository information package, which is in the .deb format: wget https://dev.mysql.com/get/mysql-apt-config_0.8.30-1_all.deb Note: To authenticate the most updated release, go to the MySQL repository webpage. Step 2: MySQL Configuration Package Installation Then, employ the .deb file for initializing the installation via dpkg: sudo dpkg -i mysql-apt-config_0.8.30-1_all.deb Respond to the prompt. For instance, pick MySQL Server & Cluster and hit Enter for starting configurations: For picking a version such as (mysql-8.4-lts), scroll downward and hit OK for the next step: Step 3: Refresh the System Now, update the server's package indexes to implement the updated MySQL info: sudo apt update Step 4: MySQL Installation Debian's default manager makes sure to install MySQL in an easier manner. Installing the package with this command: sudo apt install mysql-server -y You will see the interface for setting the root account. Input a stronger password to secure the database. In the end, hit the Ok button: Check the version on the server via the --version utility: mysql --version Step 5: Managing the Services Now, you can enable the MySQL service to initialize automatically at boot time: sudo systemctl enable mysql Activate the service via the systemctl utility: sudo systemctl start mysql Check if the system service is operational by viewing its status: sudo systemctl status mysql Step 6: MySQL Secure Installation The key or password that the individual created at the initialising procedure is currently protecting the root DB user on the server. MySQL also includes other insecure defaults, such as remote access to test databases and the root database user on the server.  It is vital to secure the MySQL installation after it has been completed as well as disable all unsafe default settings. There is a security script that can assist us in this procedure. Run the script: sudo mysql_secure_installation To activate the VALIDATE PASSWORD component and guarantee stringent password procedures, type Y and hit Enter. Next, you will need to configure several security settings: Set the Root Password: Select a strong password and make sure that it is correct. Configure the password policy for the DB server. For instance, type 2 to permit only the strong passwords on the server and hit Enter. When required to modify the root password, input N; alternatively, input Y to modify the password. Eliminate Anonymous Users: It is advised to eliminate the accessibility of anonymous users. For this, input Y and Enter when prompted. Prevent Accessibility of Remote Root: It is a better practice to avoid remote root login for multiple security concerns. To prevent the root user from having a remote access, input Y and hit Enter. Delete the Test DB: For enhancing security, the test database, which is utilized for testing, can be deleted. To do so, input Y and hit Enter. Refreshing Privilege Tables: It guarantees that all modifications are implemented instantly. To implement the configuration and edit the privileges table, hit Enter. Step 7: Access MySQL Utilizing the mysql client utility, MySQL establishes the connection and provides access to the database server console.  Now, access the shell interface and run general statements on the DB server. Let’s input the root and the password created at the time of the safe installation procedure: sudo mysql -u root -p Step 8: Basic MySQL Operations The creation of a DB and a new user for your applications rather than utilizing the root is a better practice. To accomplish the task, employ the given instructions: Create a Database: First, create a database. For instance, hostmandb is created via the below command: CREATE DATABASE hostmandb; Display All Databases: List all databases to make sure hostmandb is created: SHOW DATABASES; Create of a New User: Create a user and assign a strong password. In our example, we set Qwer@1234 as a password for the user  minhal. Replace these values with your data. CREATE USER 'minhal'@'localhost' IDENTIFIED BY 'Qwer@1234'; Give Permissions to the User: Give complete access to the hostmandb to the new user: GRANT ALL PRIVILEGES ON hostmandb.* TO 'minhal'@'localhost'; Flush Privileges: To implement the modifications, refresh the table: FLUSH PRIVILEGES; Exit the Shell: For closing the interface, utilize the EXIT statement: EXIT; Access MySQL Console as the Particular User For the purpose of testing hostmandb access, log in to MySQL as the new user, in our case minhal. sudo mysql -u minhal -p It accesses the console after entering the minhal user password when prompted: For verification, display all DBs and confirm that the hostmandb is available: SHOW DATABASES; Step 9: Configuration for Remote Access Setting up the server for supporting remote accessibility is necessary if an individual is required to access MySQL remotely. Follow these steps: Access the mysql.cnf file and modify the particular file for MySQL: sudo nano /etc/mysql/mysql.conf.d/mysqld.cnf Look for the line with the bind-address and change it to: bind-address = 0.0.0.0 Reload the MySQL service: sudo systemctl restart mysql Permit the user to have remote access: sudo mysql -u root -p GRANT ALL PRIVILEGES ON hostmandb.* TO 'minhal'@'localhost';FLUSH PRIVILEGES;EXIT; Step 10: Firewall Configuration If you have a firewall activated, you need to open the MySQL port 3306 to traffic. Set up the firewall following the below steps: Allow traffic through MySQL: sudo ufw allow mysql Now, activate the UFW on the system: sudo ufw enable Reload the firewall: sudo ufw reload Step 11: Restore and Backup Maintaining regular backups is crucial to avoiding data loss. The mysqldump utility is provided by MySQL for backup creation. To achieve this, consider these instructions: Backup a Single Database: This command employs mysqldump to create the backup of the hostmandb as a hostmandb_backup.sql file: sudo mysqldump -u root -p hostmandb> hostmandb_backup.sql Backup All Databases: For creating a backup of all databases as a file named all_databases_backup.sql with root privileges, utilize mysqldump: sudo mysqldump -u root -p --all-databases > all_databases_backup.sql Restore a Particular Database: Now, restore the hostmandb from the backup file hostmandb_backup.sql: sudo mysql -u root -p hostmandb < hostmandb_backup.sql Step 12: Optimize MySQL Operations (Optional) Depending on the workload and server resources, you can adjust settings to guarantee peak performance. These instructions will help you maximize MySQL's speed: Adjust InnoDB Buffer Pool Size: Caches for data and indexes are kept in the InnoDB buffer pool. Expanding its size can enhance its functionality. Edit the MySQL configuration file: sudo nano /etc/mysql/mysql.conf.d/mysqld.cnf The below line should be added or changed: innodb_buffer_pool_size = 1G Its size should be adjusted according to the amount of memory on the server. Enable Query Cache: The query cache stores the outcome of SELECT queries. Enabling it can enhance operations for repetitive queries. Modify the .cnf file: sudo nano /etc/mysql/mysql.conf.d/mysqld.cnf Add or edit the below lines: query_cache_type = 1query_cache_size = 64M Optimize Table Structure: Frequently optimize your customers table in hostmandb to recover wasted space and boost efficiency: USE hostmandb;OPTIMIZE TABLE customers; Analyze Operations: DB operations can be tracked and analyzed with tools like MySQL Workbench and mysqltuner. Using the command below, install mysqltuner: sudo apt install mysqltuner Run mysqltuner to get performance recommendations: sudo mysqltuner Conclusion Installing a MySQL environment is important in today's digital world. By following this instruction, you'll be able to safely install and connect to your MySQL database. This strategy not only increases security but also improves remote database maintenance efficiency. It helps to prevent breaches and ensures the confidentiality of your data. This article has given thorough instructions for the installation of MySQL's database environment on Debian. It is suggested that MySQL servers should be regularly monitored and optimized to guarantee optimum performance and dependability. In addition, Hostman offers pre-configured and ready-to-use cloud databases, including cloud MySQL. 
14 January 2025 · 8 min to read
Apache

How To Install the Apache Web Server on Ubuntu 22.04

Apache stands out as one of the most recognized and broadly utilized open-source web platforms across the globe. It is renowned for its dependability, adaptability, and profound usage. Its modular design, rich feature set, and compatibility with diverse operating systems make it a preferred choice for developers and IT professionals. For both novice and seasoned administrators, knowing how to do the installation and configuration of Apache properly is crucial, whether they are managing a sophisticated online infrastructure or setting up a simple website. With the help of this tutorial, users will build a reliable foundation for their web hosting requirements by installing Apache on Ubuntu 22.04, setting it up for maximum performance, and confirming that it is operating successfully. By employing the outlined procedures, administrators can guarantee a secure, scalable, and efficient environment, ready to support diverse online platform applications and services. Prerequisites Make sure the following requirements are satisfied before starting the installation of the Apache web server on Ubuntu 22.04 to lower the possibility of mistakes and guarantee a flawless setup. Ubuntu 22.04 System: Make sure Ubuntu 22.04 is installed on the cloud server or virtual machine. Access Rights: User must have root or sudo access to the platform. Online Connection: In order to download and install Apache and related software, a steady web connection is necessary. Domain Name (optional): Having a registered domain name is advised for anyone wishing to deploy a website. Before configuring the Apache web server, the DNS settings should be set up to point the domain to the server's IP address. System Update Ensure the engine is fully updated prior to starting the installation process. System updates reduce compatibility problems during installation by verifying that every software packages, libraries, and dependencies are up to date. Log in with administrative credentials to the server. Execute the following command for updating the system's package index. sudo apt update This will retrieve the most recent data on software and package versions from the repositories. Subsequently, upgrade the installed packages to the most recent versions by deploying the instruction below:  sudo apt upgrade Apache Installation Ubuntu's default repositories contain Apache. Employ the following command to install the core Apache package and its dependencies.  sudo apt install apache2 -y Once the installation is finished, validate if Apache was successfully installed by looking up its version. apache2 -v Next, verify that Apache is operational. sudo systemctl status apache2 Permit Apache Traffic Through the Firewall Apache traffic must be permitted if your server has the Uncomplicated Firewall (UFW) enabled. Add the necessary rules. First, make sure SSH connections are allowed: sudo ufw allow ssh Then, add the specific rule for Apache: sudo ufw allow 'Apache Full' To verify that the Apache traffic is allowed, check the status of the UFW rules. sudo ufw status Test Apache Installation Launch an internet browser and navigate to your server's IP address to make sure Apache is operating. The default Apache "Welcome Page" will be displayed if Apache is installed correctly. http://server-ip You can find the server's IP address on the server Dashboard in your Hostman control panel. You can also determine the IP address for the server by employing the command below. Check the inet field for the IP address. ip addr show In this case, the IP address of the server is 166.1.227.224. So we visit it in the web browser: http:// 166.1.227.224 Control the Apache Service To manage the Apache service, use these fundamental commands: sudo systemctl start apache2  – employ this to initialise Apache engine. sudo systemctl stop apache2  – employ this command to halt the Apache. sudo systemctl restart apache2  – employ this to reinitialise the Apache engine. sudo systemctl enable apache2  – to configure the Apache engine to start automatically upon reboot. sudo systemctl disable apache2  – to prevent the Apache service from launching automatically after a system reboot. Set up Apache (Optional) The Apache configuration files are located in /etc/apache2/. Typical configuration tasks include the techniques mentioned below. sudo nano /etc/apache2/apache2.conf This will open the main configuration file for modifying. This file manages a variety of server settings, including Apache's behavior, security protocols, and how it processes incoming web requests. /etc/apache2/sites-available This is a directory that houses virtual host configuration files in the Apache web server's configuration hierarchy. By setting distinct domains or subdomains, virtual hosts enable users to operate several websites or apps on a single Apache server. Virtual hosts allow administrators to employ several websites or web applications on a single Apache server, making it an effective solution for minimising infrastructure expenses and simplifying server management. This capability streamlines operations by consolidating multiple sites onto one server, reducing the need for additional hardware and enhancing resource utilisation. sudo a2ensite apache-config.conf This method is utilised to activate a site-specific Apache web server configuration file on systems located on /etc/apache2/sites-available/. Whenever this command is executed, the file /etc/apache2/sites-available/apache-config.conf is linked to /etc/apache2/sites-enabled/. sudo a2dissite apache-config.conf This method is used to disable a site-specific Apache web server configuration file on systems located on /etc/apache2/sites-available/. Whenever this command is executed, the file /etc/apache2/sites-available/apache-config.conf is unlinked to /etc/apache2/sites-enabled/. sudo apache2ctl configtest The goal is to verify the syntax of the configuration files for the Apache web server prior to making any modifications or restarting the service. It makes sure that the configuration files don't contain any invalid directives or syntax mistakes that could cause Apache to crash on a restart or reload. sudo systemctl reload apache2 This is used to refresh the settings of the Apache web server without halting or disrupting ongoing connections whenever there is change made on the apache configuration. Secure Apache with SSL (Optional) Installing Certbot and the Apache plugin with the command below is the standard way to secure the Apache server with HTTPS. sudo apt install certbot python3-certbot-apache -y Use Certbot to set up SSL automatically by employing the command below. Set up the SSL certificate by following the instructions on prompt (see highlighted in yellow). sudo certbot --apache Conclusion One essential step in hosting web apps or providing webpages on Ubuntu 22.04 is installing and configuring the Apache web server. Administrators can create a dependable and expandable web server environment by following the described procedures, which include installing and maintaining virtual hosts as well as testing settings. By ensuring the integrity of configuration files, operations such as sudo apache2ctl configtest lower the possibility of errors or outages. Because of its adaptability, stability, and broad community support, Apache remains a fundamental component of web hosting solutions, making it a necessary competency for both developers and IT professionals.
14 January 2025 · 6 min to read
Python

How to Split a String Using the split() Method in Python

Working with strings is integral to many programming tasks, whether it involves processing user input, analyzing log files, or developing web applications. One of the fundamental tools that simplifies string manipulation in Python is the split() method. This method allows us to easily divide strings into parts based on specified criteria, making data processing and analysis more straightforward. In this article, we'll take a detailed look at the split() method, its syntax, and usage features. You'll learn how to use this method for solving everyday tasks and see how powerful it can be when applied correctly. Regardless of your programming experience level, you'll find practical tips and techniques to help you improve your string-handling skills in Python. What is the split() Method? The split() method is one of the core tools for working with strings in Python. It is designed to split a string into individual parts based on a specified delimiter, creating a list from these parts. This method is particularly useful for dividing text into words, extracting parameters from a string, or processing data separated by special characters, such as commas or tabs. The key idea behind the split() method is to transform a single string into a set of smaller, more manageable elements. This significantly simplifies data processing and allows programmers to perform analysis and transformation tasks more quickly and efficiently. Syntax of split() The split() method is part of Python's standard library and is applied directly to a string. Its basic syntax is as follows: str.split(sep=None, maxsplit=-1) Let’s break down the parameters of the split() method: sep (separator) This is an optional parameter that specifies the character or sequence of characters used as the delimiter for splitting the string. If sep is not provided or is set to None, the method defaults to splitting the string by whitespace (including spaces, tabs, and newline characters). If the string starts or ends with the delimiter, it is handled in a specific way. maxsplit This optional parameter defines the maximum number of splits to perform. By default, maxsplit is -1, which means there is no limit, and the string will be split completely. If maxsplit is set to a positive number, the method will split the string only the specified number of times, leaving the remaining part of the string as the last element in the resulting list. These parameters make it possible to customize split() to meet the specific requirements of your task. Let’s explore practical applications of split() with various examples to demonstrate its functionality and how it can be useful in daily data manipulation tasks. Examples of Using the split() Method To better understand how the split() method works, let's look at several practical examples that demonstrate its capabilities and applicability in various scenarios. Splitting a String by Spaces The most common use of the split() method is to break a string into words. By default, if no separator is specified, split() divides the string by whitespace characters. text = "Hello world from Python" words = text.split() print(words) Output: ['Hello', 'world', 'from', 'Python'] Splitting a String by a Specific Character If the data in the string is separated by another character, such as commas, you can specify that character as the sep argument. vegetable_list = "carrot,tomato,cucumber" vegetables = vegetable_list.split(',') print(vegetables) Output: ['carrot', 'tomato', 'cucumber'] Splitting a String a Specified Number of Times Sometimes, it’s necessary to limit the number of splits. The maxsplit parameter allows you to specify the maximum number of splits to be performed. text = "one#two#three#four" result = text.split('#', 2) print(result) Output: ['one', 'two', 'three#four'] In this example, the string was split into two parts, and the remaining portion after the second separator, 'three#four', was kept in the last list element. These examples demonstrate how flexible and useful the split() method can be in Python. Depending on your tasks, you can adapt its use to handle more complex string processing scenarios. Using the maxsplit Parameter The maxsplit parameter provides the ability to limit the number of splits a string will undergo. This can be useful when you only need a certain number of elements and do not require the entire string to be split. Let's take a closer look at how to use this parameter in practice. Limiting the Number of Splits Imagine you have a string containing a full file path, and you only need to extract the drive and the folder: path = "C:/Users/John/Documents/report.txt" parts = path.split('/', 2) print(parts) Output: ['C:', 'Users', 'John/Documents/report.txt'] Using maxsplit for Log File Processing Consider a string representing a log entry, where each part of the entry is separated by spaces. You are only interested in the first two fields—date and time. log_entry = "2024-10-23 11:15:32 User login successful" date_time = log_entry.split(' ', 2) print(date_time[:2]) Output: ['2024-10-23', '11:15:32'] In this case, we split the string twice and extract only the date and time, ignoring the rest of the entry. Application to CSV Data Sometimes, data may contain delimiter characters that you want to ignore after a certain point. csv_data = "Name,Email,Phone,Address" columns = csv_data.split(',', 2) print(columns) Output: ['Name', 'Email', 'Phone,Address'] Here, we limit the number of splits to keep the fields 'Phone' and 'Address' combined. The maxsplit parameter adds flexibility and control to the split() method, making it ideal for more complex data processing scenarios. Working with Delimiters Let’s examine how the split() method handles delimiters, including its default behavior and how to work with consecutive and multiple delimiters. Splitting by Default When no explicit delimiter is provided, the split() method splits the string by whitespace characters (spaces, tabs, and newlines). Additionally, consecutive spaces will be interpreted as a single delimiter, which is particularly useful when working with texts that may contain varying numbers of spaces between words. text = "Python is a versatile language" words = text.split() print(words) Output: ['Python', 'is', 'a', 'versatile', 'language'] Using a Single Delimiter Character If the string contains a specific delimiter, such as a comma or a colon, you can explicitly specify it as the sep argument. data = "red,green,blue,yellow" colors = data.split(',') print(colors) Output: ['red', 'green', 'blue', 'yellow'] In this case, the method splits the string wherever a comma is encountered. Working with Consecutive and Multiple Delimiters It’s important to note that when using a single delimiter character, split() does not treat consecutive delimiters as one. Each occurrence of the delimiter results in a new element in the resulting list, even if the element is empty. data = "one,,two,,,three" items = data.split(',') print(items) Output: ['one', '', 'two', '', '', 'three'] Splitting a String by Multiple Characters There are cases where you need to split a string using multiple delimiters or complex splitting rules. In such cases, it is recommended to use the re module and the re.split() function, which supports regular expressions. import re beverage_data = "coffee;tea juice|soda" beverages = re.split(r'[;|\s]', beverage_data) print(beverages) Output: ['coffee', 'tea', 'juice', 'soda'] In this example, a regular expression is used to split the string by several types of delimiters. Tips for Using the split() Method The split() method is a powerful and flexible tool for working with textual data in Python. To fully leverage its capabilities and avoid common pitfalls, here are some useful recommendations: Consider the Type of Delimiters When choosing a delimiter, make sure it matches the nature of the data. For instance, if the data contains multiple spaces, it might be more appropriate to use split() without explicitly specifying delimiters to avoid empty strings in the list. Use maxsplit for Optimization If you know that you only need a certain number of elements after splitting, use the maxsplit parameter to improve performance. This will also help avoid unexpected results when splitting long strings. Use Regular Expressions for Complex Cases The split() method with regular expressions enables solving more complex splitting tasks, such as when data contains multiple types of delimiters. Including the re library for this purpose significantly expands the method’s capabilities. Handle Empty Values When splitting a string with potentially missing values (e.g., when there are consecutive delimiters), make sure your code correctly handles empty strings or None. data = "value1,,value3" result = [item for item in data.split(',') if item] Validate Input Data Always consider potential errors, such as incorrect delimiters or unexpected data formats. Adding checks for values before calling split() can prevent many issues related to incorrect string splitting. Suitability for Use Remember that split() is unsuitable for processing more complex data structures, such as nested strings with quotes or data with escaped delimiters. In such cases, consider using specialized modules, such as csv for handling CSV formats. Following these tips, you can effectively use the split() method and solve textual data problems in Python. Understanding the subtleties of string splitting will help you avoid errors and make your code more reliable and understandable. Conclusion The split() method is an essential part of string handling in Python, providing developers with flexible and powerful tools for text splitting and data processing. In this article, we explored various aspects of using the split() method, including its syntax, working with parameters and delimiters, as well as practical examples and tips for its use. Check out our app platform to find Python applications, such as Celery, Django, FastAPI and Flask.
13 January 2025 · 8 min to read
Python

How to Convert a List to a Dictionary in Python

Python offers several fundamental data structures for storing data. Among the most popular are: List: Values with indices. Dictionary: Values with keys. Converting data from one type to another is essential to any dynamically typed programming language. Python, of course, is no exception. This guide will explain in detail what lists and dictionaries are and demonstrate various ways to convert one type to another. All examples in this article were executed using the Python interpreter version 3.10.12 on the Ubuntu 22.04 operating system, running on a Hostman cloud server. The list Type A list in Python is an ordered data structure of the "index-value" type. To create a list, use square brackets with values separated by commas: my_list = [False, True, 2, 'three', 4, 5] The list structure can be displayed in the console: print(my_list) The output will look like this: [False, True, 2, 'three', 4, 5] Accessing list values is done via indices: print(my_list[0]) # Output: False print(my_list[1]) # Output: True print(my_list[2]) # Output: 2 print(my_list[3]) # Output: three print(my_list[4]) # Output: 4 print(my_list[5]) # Output: 5 The dict Type A dictionary in Python is an unordered data structure of the "key-value" type. To create a dictionary, use curly braces with keys and values separated by colons and each pair separated by commas: my_dict = { 'James': '357 99 056 050', 'Natalie': '357 96 540 432', 'Kate': '357 96 830 726' } You can display the dictionary structure in the console as follows: print(my_dict) The output will look like this: {'James': '357 99 056 050', 'Natalie': '357 96 540 432', 'Kate': '357 96 830 726'} Accessing dictionary values is done via keys: print(my_dict['James']) # Output: 357 99 056 050 print(my_dict['Natalie']) # Output: 357 96 540 432 print(my_dict['Kate']) # Output: 357 96 830 726 Converting a List to a Dictionary You can convert a list to a dictionary in several ways: Use the dict.fromkeys() function, which creates a new dictionary with keys from the list. Use a dictionary comprehension with auxiliary functions and conditional operators. The latter option provides more flexibility for generating new dictionaries from existing lists. Creating Dictionary Keys from a List Using dict.fromkeys() The simplest way to create a dictionary from a list is to take the elements of a list instance and make them the keys of a dict instance. Optionally, you can add a default value for all keys in the new dictionary. This can be achieved using the standard dict.fromkeys() function. With this method, you can set a default value for all keys but not for individual keys. Here is an example of creating such a dictionary with keys from a list: objects = ['human', 'cat', 'alien', 'car'] # list of objects objects_states = dict.fromkeys(objects, 'angry') # create a dictionary with a default value for all keys objects_states_empty = dict.fromkeys(objects) # create a dictionary without specifying default values print(objects_states) # output the created dictionary with values print(objects_states_empty) # output the created dictionary without values Console output: {'human': 'angry', 'cat': 'angry', 'alien': 'angry', 'car': 'angry'} {'human': None, 'cat': None, 'alien': None, 'car': None} Creating a Dictionary from a List Using Dictionary Comprehension Another way to turn a list into dictionary keys is by using dictionary comprehension. This method is more flexible and allows for greater customization of the new dictionary. In its simplest form, the comprehension iterates over the list and copies all its elements as keys into a new dictionary, assigning them a specified default value. Here’s how to create a dictionary from a list using dictionary comprehension: objects = ['human', 'cat', 'alien', 'car'] objects_states = {obj: 'angry' for obj in objects} # dictionary comprehension with a string as the default value objects_states_empty = {obj: None for obj in objects} # dictionary comprehension with a default value of None print(objects_states) print(objects_states_empty) Console output: {'human': 'angry', 'cat': 'angry', 'alien': 'angry', 'car': 'angry'} {'human': None, 'cat': None, 'alien': None, 'car': None} In Python, the None object is a special value (null in most programming languages) that represents the absence of a value. The None object has a type of NoneType: print(type(None))  # Output: <class 'NoneType'> Creating a Dictionary from a List Using Dictionary Comprehension and the zip() Function A more advanced method is to use two lists to generate a dictionary: one for the keys and the other for their values. For this purpose, Python provides the zip() function, which allows iteration over multiple objects simultaneously. In simple loops, we can use this function like this: objects = ['human', 'cat', 'alien', 'car'] states = ['walking', 'purring', 'hiding', 'driving'] for obj, state in zip(objects, states): print(obj, state) The console output will be: human walking cat purring alien hiding car driving Thanks to this function, dictionary comprehension can simultaneously use elements from one list as keys and elements from another as values. In this case, the syntax for dictionary comprehension is not much different from a simple iteration: objects = ['human', 'cat', 'alien', 'car'] # list of future dictionary keys states = ['walking', 'purring', 'hiding', 'driving'] # list of future dictionary values objects_states = {obj: state for obj, state in zip(objects, states)} # dictionary comprehension iterating over both lists print(objects_states) Console output: {'human': 'walking', 'cat': 'purring', 'alien': 'hiding', 'car': 'driving'} A natural question arises: what happens if one of the lists is shorter than the other? objects = ['human', 'cat', 'alien', 'car'] states = ['walking', 'purring'] objects_states = {obj: state for obj, state in zip(objects, states)} print(objects_states) The output will be: {'human': 'walking', 'cat': 'purring'} Thus, iteration in the dictionary comprehension stops at the shortest list. The code above can be written in a very compact form using the dict() constructor: objects = ['human', 'cat', 'alien', 'car'] states = ['walking', 'purring', 'hiding', 'driving'] objects_states = dict(zip(objects, states)) # create a dictionary from two lists without a for loop print(objects_states) The console output will be the same as in the previous examples: {'human': 'walking', 'cat': 'purring', 'alien': 'hiding', 'car': 'driving'} Creating a Dictionary with zip() and Conditional Logic In real-world applications, logic is often more complex than the simple examples shown earlier. Sometimes, you need to convert lists into dictionaries while applying specific conditions. For instance, some elements might need modification before inclusion in the dictionary or might not be included at all. This can be achieved using conditions in dictionary comprehensions. For example, we can exclude specific elements from the resulting dictionary: objects = ['human', 'cat', 'alien', 'car'] states = ['walking', 'purring', 'hiding', 'driving'] objects_states = {obj: state for obj, state in zip(objects, states) if obj != 'alien'} # Protect Earth from unknown extraterrestrial influence print(objects_states) Console output: {'human': 'walking', 'cat': 'purring', 'car': 'driving'} We can refine the selection criteria further by introducing multiple conditions: objects = ['human', 'cat', 'alien', 'car'] states = ['walking', 'purring', 'hiding', 'driving'] objects_states = {obj: state for obj, state in zip(objects, states) if obj != 'alien' if obj != 'cat'} # Exclude the alien and the cat—who might be a disguised visitor from another galaxy print(objects_states) Console output: {'human': 'walking', 'car': 'driving'} When using multiple if statements in a dictionary comprehension, they behave as if connected by a logical and operator. You can make dictionary generation even more flexible by combining if and else operators: objects = ['human', 'cat', 'alien', 'car'] states = ['walking', 'purring', 'hiding', 'driving'] # In this example, all string elements in the first list are longer than those in the second list, except for 'cat' objects_states = { obj: ('[SUSPICIOUS]' if len(obj) < len(state) else 'calmly ' + state) for obj, state in zip(objects, states) } # Mark the suspicious 'cat' appropriately and slightly modify other values print(objects_states) Console output: {'human': 'calmly walking', 'cat': '[SUSPICIOUS]', 'alien': 'calmly hiding', 'car': 'calmly driving'} Creating a Complex Dictionary from a Single List In the earlier examples, we created dictionaries from two separate lists. But what if the keys and values needed for the new dictionary are contained within a single list? In such cases, the logic of the dictionary comprehension needs to be adjusted: objects_and_states = [ 'human', 'walking', 'cat', 'purring', 'alien', 'hiding', 'car', 'driving' ] # Keys and values are stored sequentially in one list objects_states = { objects_and_states[i]: objects_and_states[i + 1] for i in range(0, len(objects_and_states), 2) } # The `range` function specifies the start, end, and step for iteration: range(START, STOP, STEP) print(objects_states) Console output: {'human': 'walking', 'cat': 'purring', 'alien': 'hiding', 'car': 'driving'} Sometimes, a list might contain nested dictionaries as elements. The values of these nested dictionaries can also be used to create a new dictionary. Here’s how the logic changes in such cases: objects = [ {'name': 'human', 'state': 'walking', 'location': 'street'}, {'name': 'cat', 'state': 'purring', 'location': 'windowsill'}, {'name': 'alien', 'state': 'hiding', 'location': 'spaceship'}, {'name': 'car', 'state': 'driving', 'location': 'highway'} ] objects_states = { obj['name']: obj['state'] for obj in objects } # Extract 'name' as key and 'state' as value print(objects_states) Console output: {'human': 'walking', 'cat': 'purring', 'alien': 'hiding', 'car': 'driving'} This approach enables handling more complex data structures, such as lists of dictionaries, by targeting specific key-value pairs from each nested dictionary. Converting a Dictionary to a List Converting a dictionary into a list in Python is a straightforward task, often better described as extracting data. From a single dictionary, you can derive several types of lists: A list of keys A list of values A list of key-value pairs Here’s how it can be done: objects_states = { 'human': 'walking', 'cat': 'purring', 'alien': 'hiding', 'car': 'driving' } # Convert dictionary components to lists using the `list()` function objects_keys = list(objects_states.keys()) # List of keys objects_values = list(objects_states.values()) # List of values objects_items = list(objects_states.items()) # List of key-value pairs print(objects_keys) print(objects_values) print(objects_items) Console output: ['human', 'cat', 'alien', 'car'] ['walking', 'purring', 'hiding', 'driving'] [('human', 'walking'), ('cat', 'purring'), ('alien', 'hiding'), ('car', 'driving')] Conclusion Lists and dictionaries are fundamental data structures in Python, each offering distinct ways of storing and accessing data. Dictionaries are more informative than lists, storing data as key-value pairs, whereas lists store values that are accessed by index. Converting a dictionary into a list is straightforward, requiring no additional data since you’re simply extracting keys, values, or their pairs. Converting a list into a dictionary, on the other hand, requires additional data or rules to map the list elements to dictionary keys and values. There are a few methods to convert a List to Dictionary Tool Key Values Syntax dict.fromkeys() Common new_dict = dict.fromkeys(old_list) Dictionary Comprehension Common new_dict = {new_key: 'any value' for new_key in old_list} Dict Comp + zip() Unique new_dict = {new_key: old_val for new_key, old_val in zip(list1, list2)} Dict Comp + zip() + if Unique new_dict = {new_key: old_val for new_key, old_val in zip(list1, list2) if ...} Dict Comp + zip() + if-else Unique new_dict = {new_key: (... if ... else ...) for new_key, old_val in zip(list1, list2)} Complex lists may require more intricate dictionary comprehension syntax. Techniques shown in this guide, such as using zip() and range() for iterations, help handle such cases. Converting a dictionary to a list is also possible in several ways, but it is much simpler. Tool Extracts Syntax list.keys() Keys list(old_dict.keys()) list.values() Values list(old_dict.values()) list.items() Key-Value Pairs list(old_dict.items()) Python offers flexible and efficient ways to convert structured data types between lists and dictionaries, enabling powerful manipulation and access.
13 January 2025 · 11 min to read
Python

Dictionaries in Python

A dictionary (or dict) is an unordered data structure in Python (unlike a list) that takes the form of "key-value" pairs. In simpler terms, a dictionary is like a notebook with no specific order, where each number (value) is associated with a specific name (key). James +357 99 056 050 Julia +357 96 540 432 Alexander +357 96 830 726 Each key in a Python dictionary is completely unique, but the values can be repeated. For example, if you add a new entry with the name "Julia" (value) and a new number (key), the entry will not duplicate but instead update the existing value. To find a specific number, you need to provide the name. This makes Python dictionaries a convenient way to search through large datasets. The following data types can be used as keys: Strings Numbers (integers and floats) Tuples Values can be any data type, including other dictionaries and lists. Creating a Dictionary This guide uses Python version 3.10.12. Using Curly Braces {} The simplest and most straightforward way to create a dictionary is by using curly braces. For example, this creates an empty dictionary with no keys or values: empty_dictionary = {} Here’s how to create a dictionary with keys and values inside: team_ages = {"Alexander": 23, "Victoria": 43, "Eugene": 26, "Meredith": 52, "Maria": 32} The names in quotes are the keys, and the numbers are their values. The previously shown table can be represented as a dictionary like this: team_phones = { "James": "+357 99 056 050", "Julia": "+357 96 540 432", "Alexander": "+357 96 830 726" } In this case, the values are of string type, not numeric. By the way, you can also use single quotes instead of double quotes: team_phones = { 'James': '+357 99 056 050', 'Julia': '+357 96 540 432', 'Alexander': '+357 96 830 726' } Using the dict() Function As with many other types of variables, a dictionary can be created using its corresponding function. For example, this creates an empty dictionary: just_dictionary = dict() And this creates a dictionary with keys and values: keys_and_values = [("Alexander", 23), ("Victoria", 43), ("Eugene", 26), ("Meredith", 52), ("Maria", 32)] team_ages = dict(keys_and_values) In this case, a list of so-called tuples — pairs of "key-value" — is created first. However, there is a more concise way to create a dictionary using the function: team_ages = dict(Alexander = 23, Victoria = 43, Eugene = 26, Meredith = 52, Maria = 32) Here, each function argument becomes a key with a corresponding value in the new dictionary. Using the dict.fromkeys() Function Another way to create a dictionary is by converting a list into a dictionary. There are a few nuances to this approach: The elements of the list become the keys of the new dictionary. You can specify a default value for all keys at once, rather than for each key individually. For example, this creates a dictionary where the values of the keys will be empty: team_names = ["Alexander", "Victoria", "Eugene", "Meredith", "Maria"] # list with keys team_ages = dict.fromkeys(team_names) print(team_ages) The console output will be: {'Alexander': None, 'Victoria': None, 'Eugene': None, 'Meredith': None, 'Maria': None} And this creates a dictionary with a specified value, which will be common for all keys: team_names = ["Alexander", "Victoria", "Eugene", "Meredith", "Maria"] team_ages = dict.fromkeys(team_names, 0) # setting the default value as the second argument print(team_ages) The console output will be: {'Alexander': 0, 'Victoria': 0, 'Eugene': 0, 'Meredith': 0, 'Maria': 0} Dictionary Comprehension A more unconventional way to create a dictionary is by generating it from other data using a so-called dictionary comprehension, which is a compact for loop with rules for dictionary generation written inside. In this case, the generator loop iterates through the data structure from which the dictionary is created. For example, here’s how to create a dictionary from a list with a default value for all keys: team_names = ["Alexander", "Victoria", "Eugene", "Meredith", "Maria"] team_ages = {name: 0 for name in team_names} # dictionary generator with 0 as the default value print(team_ages) The console output will be identical to the previous example: {'Alexander': 0, 'Victoria': 0, 'Eugene': 0, 'Meredith': 0, 'Maria': 0} However, the main advantage of this method is the ability to assign individual values to each key. For this, you need to prepare two lists and slightly modify the basic dictionary comprehension syntax: team_names = ["Alexander", "Victoria", "Eugene", "Meredith", "Maria"] team_numbers = [23, 43, 26, 52, 32] team_ages = {name: age for name, age in zip(team_names, team_numbers)} # using the zip() function to iterate over two lists simultaneously print(team_ages) The zip() function combines the two lists into a list of tuples, which is then iterated over in the comprehension loop. In this case, the console output will be: {'Alexander': 23, 'Victoria': 43, 'Eugene': 26, 'Meredith': 52, 'Maria': 32} There is also a more complex variant that generates a dictionary from a single list containing both keys and values: team_data = ["Alexander", 23, "Victoria", 43, "Eugene", 26, "Meredith", 52, "Maria", 32] # keys and values are stored sequentially in one list team_ages = {team_data[i]: team_data[i+1] for i in range(0, len(team_data), 2)} # loop runs through the list with a step of 2 print(team_ages) In this example, the range() function sets the length and iteration step for the loop. The console output will be identical to the previous ones: {'Alexander': 23, 'Victoria': 43, 'Eugene': 26, 'Meredith': 52, 'Maria': 32} Adding Elements You can add an element to a dictionary by specifying a previously non-existent key in square brackets and assigning a new value to it: team_ages = {"Alexander": 23, "Victoria": 43, "Eugene": 26, "Meredith": 52, "Maria": 32} team_ages["Catherine"] = 28 # Adding a new key-value pair print(team_ages) The console output will be: {'Alexander': 23, 'Victoria': 43, 'Eugene': 26, 'Meredith': 52, 'Maria': 32, 'Catherine': 28} Modifying Elements Modifying an element is syntactically the same as adding one, except that the element already exists in the dictionary: team_ages = {"Alexander": 23, "Victoria": 43, "Eugene": 26, "Meredith": 52, "Maria": 32} team_ages["Victoria"] = 44 # Updating the existing value print(team_ages) The console output will be: {'Alexander': 23, 'Victoria': 44, 'Eugene': 26, 'Meredith': 52, 'Maria': 32} Accessing Elements You can access the values in a dictionary using square brackets with the key: team_ages = {"Alexander": 23, "Victoria": 43, "Eugene": 26, "Meredith": 52, "Maria": 32} print(team_ages["Eugene"]) The console output will be: 26 Or with a more visual example using the previously shown table: team_phones = { "James": "+357 99 056 050", "Julia": "+357 96 540 432", "Alexander": "+357 96 830 726" } print(team_phones["Julia"]) The console output will be: +357 96 540 432 Removing Elements You can remove an element from a dictionary using the del keyword: team_ages = {"Alexander": 23, "Victoria": 43, "Eugene": 26, "Meredith": 52, "Maria": 32} del team_ages["Victoria"] # Deleting the element with the key "Victoria" print(team_ages) The console output will not contain the deleted element: {'Alexander': 23, 'Eugene': 26, 'Meredith': 52, 'Maria': 32} Managing Elements A dictionary in Python has a set of special methods for managing its elements — both keys and values. Many of these methods duplicate the previously shown functions for adding, modifying, and deleting elements. The dict.update() Function This method adds new elements to a dictionary by passing another dictionary as an argument: team_ages = {"Alexander": 23, "Victoria": 43, "Eugene": 26, "Meredith": 52, "Maria": 32} team_ages.update({ "John": 32, "Catherine": 28 }) print(team_ages) The output in the console will be: {'Alexander': 23, 'Victoria': 43, 'Eugene': 26, 'Meredith': 52, 'Maria': 32, 'John': 32, 'Catherine': 28} The same result can be achieved by pre-creating a dictionary with the elements to be added: team_ages = {"Alexander": 23, "Victoria": 43, "Eugene": 26, "Meredith": 52, "Maria": 32} team_add = {"John": 32, "Catherine": 28} team_ages.update(team_add) print(team_ages) Again, the output will be the same: {'Alexander': 23, 'Victoria': 43, 'Eugene': 26, 'Meredith': 52, 'Maria': 32, 'John': 32, 'Catherine': 28} The dict.get() Function You can access the value of a dictionary not only with square brackets but also through the corresponding function: team_ages = {"Alexander": 23, "Victoria": 43, "Eugene": 26, "Meredith": 52, "Maria": 32} print(team_ages.get("Victoria")) print(team_ages["Victoria"]) Both console outputs will be: 4343 Now, what happens if a non-existing key is passed as an argument: team_ages = {"Alexander": 23, "Victoria": 43, "Eugene": 26, "Meredith": 52, "Maria": 32} print(team_ages.get("Anastasia")) The console output will be: None However, the main feature of get() compared to square brackets is the ability to specify a value for a non-existing key as the second argument: team_ages = {"Alexander": 23, "Victoria": 43, "Eugene": 26, "Meredith": 52, "Maria": 32} print(team_ages.get("Anastasia", "Non-existent employee")) In this case, the console output will be: Non-existent employee When using square brackets, you would need to use a try/except block to handle cases where you are not sure if the key exists. The dict.pop() Function In dictionaries, there is a specific function to delete an element by key: team_ages = {"Alexander": 23, "Victoria": 43, "Eugene": 26, "Meredith": 52, "Maria": 32} team_ages.pop("Alexander") print(team_ages) The console output will be: {'Victoria': 43, 'Eugene': 26, 'Meredith': 52, 'Maria': 32} The dict.popitem() Function Instead of deleting a specific element by key, you can delete the last added item: team_ages = {"Alexander": 23, "Victoria": 43, "Eugene": 26, "Meredith": 52, "Maria": 32} team_add = {"John": 32, "Catherine": 28} team_ages.update({"John": 32}) print(team_ages) team_ages.popitem() print(team_ages) The console output will show the dictionary with the added element and then its contents after the element is removed: {'Alexander': 23, 'Victoria': 43, 'Eugene': 26, 'Meredith': 52, 'Maria': 32, 'John': 32} {'Alexander': 23, 'Victoria': 43, 'Eugene': 26, 'Meredith': 52, 'Maria': 32} The dict.clear() Function You can completely clear a dictionary using the corresponding method: team_ages = {"Alexander": 23, "Victoria": 43, "Eugene": 26, "Meredith": 52, "Maria": 32} team_ages.clear() print(team_ages) The console output will show an empty dictionary: {} The dict.copy() Function You can fully copy a dictionary: team_ages = {"Alexander": 23, "Victoria": 43, "Eugene": 26, "Meredith": 52, "Maria": 32} team_ages_copy = team_ages.copy() print(team_ages) print(team_ages_copy) The console output will contain the same content from two different dictionaries: {'Alexander': 23, 'Victoria': 43, 'Eugene': 26, 'Meredith': 52, 'Maria': 32} {'Alexander': 23, 'Victoria': 43, 'Eugene': 26, 'Meredith': 52, 'Maria': 32} The dict.setdefault() Function Sometimes, the mechanics of adding or retrieving a key are not enough. Often, you need more complex behavior. For example, in some cases, you need to check for the presence of a key and immediately get its value, and if the key doesn't exist, it should be automatically added. Python provides a special method for this operation: team_ages = {"Alexander": 23, "Victoria": 43, "Eugene": 26, "Meredith": 52, "Maria": 32} print(team_ages.setdefault("Alexander")) # This key already exists print(team_ages.setdefault("John")) # This key doesn't exist, so it will be created with the value None print(team_ages.setdefault("Catherine", 29)) # This key doesn't exist, so it will be created with the value 29 The console output will show results for all requested names, regardless of whether they existed at the time of the function call: 23None29 Dictionary Transformation You can extract data from a dictionary's keys and values. Typically, this extraction operation is performed to convert the dictionary into another data type, such as a list. There are several functions for extracting data from a dictionary in Python: dict.keys() — returns an object with the dictionary's keys dict.values() — returns an object with the dictionary's values dict.items() — returns an object with "key-value" tuples Here's an example of how to extract data from a dictionary and convert it into a list: team_phones = { "James": "+357 99 056 050", "Julia": "+357 96 540 432", "Alexander": "+357 96 830 726" } # All returned objects are converted into lists using the list() function team_names = list(team_phones.keys()) # List of dictionary keys team_numbers = list(team_phones.values()) # List of dictionary values team_all = list(team_phones.items()) # List of "key-value" pairs print(team_names) print(team_numbers) print(team_all) The console output will be: ['James', 'Julia', 'Alexander'] ['+357 99 056 050', '+357 96 540 432', '+357 96 830 726'] [('James', '+357 99 056 050'), ('Julia', '+357 96 540 432'), ('Alexander', '+357 96 830 726')] In the above example, the returned objects from the dictionary are explicitly converted into lists. However, this step is not necessary: team_phones = { "James": "+357 99 056 050", "Julia": "+357 96 540 432", "Alexander": "+357 96 830 726" } print(team_phones.keys()) print(team_phones.values()) print(team_phones.items()) The console output will be: dict_keys(['James', 'Julia', 'Alexander']) dict_values(['+357 99 056 050', '+357 96 540 432', '+357 96 830 726']) dict_items([('James', '+357 99 056 050'), ('Julia', '+357 96 540 432'), ('Alexander', '+357 96 830 726')]) Conclusion In Python, a dictionary is an unordered data structure in the form of "key-value" pairs, with which you can perform the following operations: Creating a dictionary from scratch Generating a dictionary from other data Adding elements Modifying elements Accessing elements Removing elements Managing elements Transforming the dictionary Thus, a dictionary solves many problems related to finding a specific value within a large data structure — any value from the dictionary is retrieved using its corresponding key. If you want to build a web service using Python, you can rent a cloud server at competitive prices with Hostman.
10 January 2025 · 12 min to read
Python

How to Remove Spaces from a String in Python

Strings are one of the fundamental data types in Python, storing a sequence of characters. With strings, you can perform many operations: splitting, joining, replacing, comparing, and more. Sometimes, it's necessary to format strings by removing unnecessary characters, such as spaces. This article will cover the methods available in Python (version 3.10.12) for removing spaces from strings. Removing Spaces from the Start and End Often, we need to remove only extra spaces, such as those at the start or end of a string. Python provides several similar methods for this purpose: strip() removes spaces from both the string's start and end. lstrip() removes spaces only from the start. rstrip() removes spaces only from the end. Here’s an example of how to clean up a string by removing spaces at the edges: text_before = " This is a string with spaces " text_after = text_before.strip() text_after_left = text_before.lstrip() text_after_right = text_before.rstrip() print(text_after) print(text_after_left) print(text_after_right) Console output: This is a string with spaces This is a string with spaces This is a string with spaces Removing All Spaces In some cases, you may need to remove all spaces entirely. This can be done by replacing every space character with an empty string: text_before = " This is a string with spaces " text_after = text_before.replace(' ', '') print(text_after) Console output: Thisisastringwithspaces Another way to remove all spaces is to use the translate() method. While less intuitive, it can be more flexible in certain scenarios: text_before = " This is a string with spaces " text_after = text_before.translate({ord(' '): None}) print(text_after) Console output: Thisisastringwithspaces The translate() function takes a dictionary as an argument, where the keys are ASCII codes of characters to be replaced, and the values are the replacement characters. The ord() function converts a character to its corresponding ASCII code. With translate(), you can replace multiple characters at once. For example: text_before1 = " This is a string with spaces " text_before2 = " 1 2 3 4 5 " text_before3 = " { 'someData': 100, 'otherData': 'information' } " space_table = str.maketrans({' ': None}) text_after1 = text_before1.translate(space_table) text_after2 = text_before2.translate(space_table) text_after3 = text_before3.translate(space_table) print(text_after1) print(text_after2) print(text_after3) Console output: Thisisastringwithspaces 12345 {'someData':100,'otherData':'information'} Removing Repeated Spaces The simplest way to remove all repeated spaces in a string is to perform the following steps: Split the string using the split() function by spaces as delimiters, resulting in a list of substrings. Join the substrings from the list back into a single string using the join() function with a single space as the separator. Here’s how this can be done: text_before = " This is a string with spaces " # Split the string into substrings; spaces are the default delimiter text_splitted = text_before.split() # Join the substrings into a single string using a space as the delimiter text_after = ' '.join(text_splitted) print(text_after) In the console, you’ll see the formatted string without extra spaces: This is a string with spaces You can write the same operations more concisely: text_before = " This is a string with spaces " text_after = ' '.join(text_before.split()) print(text_after) The console output will remain the same: This is a string with spaces Using this method, you can also replace spaces with any other character: text_before = " This is a string with spaces " text_after = '_'.join(text_before.split()) print(text_after) In this case, the console output will be: This_is_a_string_with_spaces Removing Spaces Using Regular Expressions The methods shown earlier are effective for simple scenarios. However, strings often have more complex patterns, requiring advanced methods to remove spaces. A highly flexible way to handle string modifications is by using regular expressions. Here’s an example: import re # Import the module for working with regular expressions # A string containing sequences of two or more spaces, as well as some single spaces text_before = " This is a string with spaces . " # Replace all sequences of two or more spaces with a single space text_after = re.sub(r"\s+", " ", text_before) print(text_after) The console output will be a string where only single spaces remain: This is a string with spaces . This example introduces some problems: Multiple spaces before the period at the end are replaced with a single space. However, there should not be any space before the period. A sequence of spaces at the start of the string is replaced by a single space. However, there should not be any spaces at the beginning of the string. We can resolve these issues by applying a sequence of transformations: import re text_before = " This is a string with spaces . " # Remove spaces at the start and end of the string using the OR operator (|) text_after = re.sub(r"^\s*|\s*$", "", text_before) # Replace all repeated spaces with a single space text_after = re.sub(r"\s+", " ", text_after) # Replace all periods surrounded by spaces with just a period text_after = re.sub(r"\s*[.]\s*", ".", text_after) print(text_after) The console output will now contain a properly formatted string without unnecessary spaces: This is a string with spaces. Here: \s: Matches any whitespace character (spaces, tabs, etc.). +: Matches one or more repetitions of the preceding element. *: Matches zero or more repetitions of the preceding element. |: Represents a logical OR, allowing you to combine multiple conditions. ^: Anchors the match at the beginning of the string. $: Anchors the match at the end of the string. When using regular expressions, it’s important to understand the potential structure of the strings being processed to design an appropriate solution. For example: If the string may have periods surrounded by spaces, this must be handled explicitly. The more complex the string patterns, the more intricate the logic for removing spaces becomes. Ultimately, removing spaces from a string in Python often requires a custom solution tailored to the specific case. Removing Spaces Using a Loop For more complex string manipulation (in this case, removing spaces), you can manually check each character in a loop with multiple conditions. This approach offers more flexibility and control over the process. In the simplest case, removing spaces inside a loop looks like this: # Define a function for more complex string processing logic def complexRemoval(string): after = "" for i in string: if not i.isspace(): # The isspace() function checks if the character is a space and returns a boolean result (True or False) after += i return after text_before = " This is a string with spaces . " text_after = complexRemoval(text_before) print(text_after) The console output will contain all the characters of the original string, but without spaces: Thisisastringwithspaces. Clearly, this isn't the desired result, so we need to complicate the logic for removal. To refine the logic, we can introduce a variable to track whether the previous character was a space: def complexRemoval(string): after = "" wasSpace = True # Variable to track if the previous character was a space for i in string: if not i.isspace(): # If the character is not a space if i == '.' and wasSpace: # If we encounter a period and the previous character was a space, remove it after = after[:len(after) - 1] # Remove the last character (space) after += i wasSpace = False elif not wasSpace: # If it's a space but the previous character was not a space after += i wasSpace = True return after # Test cases print(complexRemoval(" This is a string with spaces . ")) print(complexRemoval("Lots of different spaces blah blah blah . Also a period . ")) The output in the console will now show perfectly formatted strings without unnecessary spaces: This is a string with spaces.Lots of different spaces blah blah blah. Also a period. This method allows for more complex processing of spaces in strings, such as removing spaces before periods or handling sequences of spaces efficiently. Conclusion The Python programming language offers a specific set of built-in tools for string manipulation — for example, operations with space characters: Removing spaces at the beginning of a string Removing spaces at the end of a string Removing spaces from both ends of a string Removing all spaces in a string Removing spaces from a string according to specific rules (using regular expressions) Removing spaces according to unique rules (using iteration) Each variant has its own set of methods — most of which we have covered in this guide. If you want to build a web service using Python, you can rent a cloud server at competitive prices with Hostman.
10 January 2025 · 8 min to read
CSS

How to Change the Color of HTML Elements

When working with a webpage, you often need to enrich the markup by adding visual variety. This can be driven by design requirements or personal preferences. There are many ways to make a page more visually appealing, from font choices to the dynamic behavior of content when scrolling. One of the key graphic techniques is changing the background or text color on the page. Modern browsers allow you to flexibly choose background colors or combinations and specify the desired values in a format that suits you. Elements That Can Have Color Almost any HTML element can have its color. The color is applied in different ways depending on what exactly you want to color. For example, if you need to change the color of text in HTML, you can use the color attribute, and for borders around it, the border-color attribute. These attributes can be set either directly in the markup using HTML attributes or in a CSS file linked to the markup. When working with colors in HTML, elements can be roughly divided into two groups: text elements and block elements. In text elements, you set the color of the text and its styling, while in block elements, you set the background and border colors. Text Elements Text elements include, for example, paragraphs or input fields. For these elements, you can use several attributes for visual styling. Let's look at how to change the text color: color: This attribute is used to set the color of the text and any text decoration (such as underline, overline, etc.). background-color: In addition to changing the text color, it is often required to change the background color as well. This attribute is used for such cases. text-shadow: Sometimes, text design on the page requires a shadow. If the shadow color differs from the default, you can set it using the text-shadow attribute. text-decoration-color: When you set a color for a text element using the color attribute, the color is applied to the accompanying text decoration. But if you want to set a different color for underlining, for example, you can use this attribute. caret-color: In specific cases, you may need to style input fields (input, textarea) or elements with the contenteditable attribute. This attribute allows you to color the caret (the vertical cursor) that appears in the fields. Block Elements For block elements, such as div, you can flexibly set background and border colors regardless of the content inside the block. background-color: Adds a fill to the entire area of the block element. This attribute will help if you're wondering how to change the background color in HTML for the entire page. Just add the attribute to the body styles and specify the desired color. outline-color: Sets the color of the outline around the element if an outline style is specified with outline-style. border-color: Allows you to set the color for the borders around the block element. To set the color for each side — top, bottom, right, and left — use the attributes border-top-color, border-bottom-color, border-right-color, and border-left-color respectively. Other Elements In addition to the HTML elements mentioned above, you can also work with the visual design of the page using technologies such as SVG, Canvas, or WebGL. How to Change Text Color in CSS The first step in using color in your markup is to determine how to specify it so that the browser understands how to color the element.  The way you specify the color primarily depends on how specific or complex the color is. For instance, there’s a difference between using a basic color like blue or combining red, green, and blue in different proportions, potentially with transparency. Key CSS Keywords The simplest way to specify a color is by using a keyword, such as green or lightgrey. For example, to use black for text, you would write color: black;, and the browser will automatically understand the color to display. You can find a complete list of reserved color keywords in the documentation. RGB Model RGB stands for Red, Green, and Blue. When you specify a color using the RGB model, you define the color by mixing three primary colors: red, green, and blue. Like in a regular color palette, mixing these colors in varying proportions creates new combinations and shades. The three RGB values are integers between 0 and 255 or percentages from 0 to 100. For example, when you specify rgb(0, 0, 255), you will see the color blue in the browser. Modern browsers also support an extended version of RGB, called RGBA, where you can specify color transparency. This is done by adding a fourth value for transparency in percentage form. For example, blue with 50% transparency would be written as rgba(0, 0, 255, 0.5). HEX Representation A HEX color is a hexadecimal representation of the RGB model. The color code consists of three pairs of hexadecimal digits, each representing the red, green, and blue components respectively. For example, specifying #00ff00 will display green. If each color group contains identical characters (for example, #2211dff), you can use a shorthand representation — #21f. HSL System HSL stands for Hue, Saturation, and Lightness. In this system, the color is not determined by mixing the three parameters. Instead, each component is independent, which makes it easy to adjust the color's saturation or brightness while keeping the same hue. This system allows more control over the color's appearance without altering the basic tone.
09 January 2025 · 5 min to read
Python

How to Check if a Key Exists in a Python Dictionary

A dictionary (dict) in Python is an unordered data structure that uses a "key-value" format. Any value within the dictionary is accessed by explicitly referencing the key associated with the desired value. Attempting to access a non-existent key results in a program error. To avoid such errors, it’s essential to check whether a key exists in a dictionary before trying to access its value. Python provides several built-in methods for this purpose, which we discuss in this tutorial. In this guide, we use Python 3.10.12 running on Ubuntu 22.04. Using the in Operator with a Dictionary The most common way to check if a key exists in a dictionary is by using the in operator in an if/else condition: some_dict = {'name': 'James', 'age': 35, 'occupation': 'Just a guy...'} some_key = 'name' if some_key in some_dict: print('The key "' + some_key + '" was found.') else: print('The key "' + some_key + '" was not found.') Here, the in operator returns True if the key is found and False otherwise. Using the in Operator with dict.keys() You can also use the in operator with the list of dictionary keys obtained via the dict.keys() method: some_dict = {'name': 'James', 'age': 35, 'occupation': 'Just a guy...'} some_key = 'name' if some_key in some_dict.keys(): print('The key "' + some_key + '" was found.') else: print('The key "' + some_key + '" was not found.') As you can see, the logic is identical to the previous example, except that the dict.keys() method is used instead of the dictionary instance. At first glance, this approach might seem redundant. However, in practical applications, there may be scenarios where you specifically need to work with the list of dictionary keys rather than the dictionary itself. Using dict.keys(), you can elegantly determine if a specified key exists in the dictionary. Using the dict.get() Function You can check for the presence of a key in a dictionary by attempting to retrieve its value using the built-in dict.get() method: some_dict = {'name': 'James', 'age': 35, 'occupation': 'Just a guy...'} some_key = 'salary' some_value = some_dict.get(some_key) # Try to fetch the value for the key # If the returned value is None, it indicates the key does not exist if some_value is not None: print('The key "' + some_key + '" was found, and its value is "' + str(some_value) + '".') else: print('The key "' + some_key + '" was not found.') As shown, accessing a non-existent key with dict.get() will not raise an error (as would happen with square bracket access) but will return a None value. However, this method has a potential drawback: the requested key might actually exist in the dictionary, but its value could still be None: some_dict = {'name': 'James', 'age': 35, 'occupation': 'Just a guy...', 'salary': None} some_key = 'salary' # The key exists, but its value is None some_value = some_dict.get(some_key) # Returns None print('It is unclear if the key "' + some_key + '" exists or if it exists with a value of None.') In such cases, whether the key does not exist or exists with a None value is ambiguous. We can address this issue by using the ability of dict.get() to set a default value for non-existent keys: some_dict1 = {'name': 'James', 'age': 35, 'occupation': 'Just a guy...', 'salary': None} some_dict2 = {'name': 'James', 'age': 35, 'occupation': 'Just a guy...'} some_key = 'salary' some_value1 = some_dict1.get(some_key, "Salary not specified") some_value2 = some_dict2.get(some_key, "Salary not specified") print('Attempting to access the key "' + some_key + '" returned the value "' + str(some_value1) + '".') print('Attempting to access the key "' + some_key + '" returned the value "' + str(some_value2) + '".') Console output: Attempting to access the key "salary" returned the value "None". Attempting to access the key "salary" returned the value "Salary not specified". If you attempt to retrieve the value of a non-existent key using square brackets, it will always result in an error. In the future, this error can be handled using a try/except block, thereby determining whether the key actually exists. try/except Exception Handling You can check if a key exists in a dictionary by handling errors with try/except—a direct, "straightforward" approach. In this method, if accessing the key raises an error, it indicates that the key does not exist. Conversely, if no error is raised, the key exists. To implement this, wrap the key access in a try/except block: some_dict = {'name': 'James', 'age': 35, 'occupation': 'Just a guy...'} some_key = 'name' try: some_value = some_dict[some_key] print('The key "' + some_key + '" was found, and its value is "' + some_value + '".') except KeyError: print('The key "' + some_key + '" was not found.') This method of checking for a key in a Python dictionary should generally be used as a fallback when other methods are not suitable. This is because exception handling in Python tends to be relatively slow, which can reduce program performance. Nonetheless, checking a key via try/except is a valid approach when needed. Using a for Loop In programs with more complex logic, explicit key searches in a dictionary might be required—especially if the search is combined with modifying the values of the found keys. In such cases, you can manually iterate over the dictionary using a for loop: some_dict = {'name': 'James', 'age': 35, 'occupation': 'Just a guy...'} some_key = 'name' is_found = False # Variable to store the search status # Iterate through the dictionary for found_key in some_dict: if found_key == some_key: is_found = True some_dict[found_key] = 'Jim' # Modify the value of the found key if is_found: print('The key "' + some_key + '" was found, and its value is now "' + some_dict[some_key] + '".') else: print('The key "' + some_key + '" was not found.') In this example, all dictionary keys are sequentially iterated over, and the value of the found key is modified. This approach allows for implementing more complex logic, combining both key searches and value modifications. Using a while Loop In some cases, it might be useful to use a while loop instead of a for loop: some_dict = {'name': 'James', 'age': 35, 'occupation': 'Just a guy...'} some_key = 'occupation' is_found = False some_keys = list(some_dict) # Convert dictionary keys to a list i = 0 while i < len(some_keys): if some_keys[i] == some_key: is_found = True some_dict[some_key] = 'Jim' # Modify the value of the found key break i += 1 if is_found: print('The key "' + some_key + '" was found, and its value is now "' + some_dict[some_key] + '".') else: print('The key "' + some_key + '" was not found.') While the overall application logic does not change, the syntax differs from the for loop approach. Conclusion Before accessing a value in a dictionary, it is essential to ensure that the desired key exists in the dictionary. Otherwise, you may encounter an error, causing the program to crash. This check can be performed using several built-in methods: in operator dict.get() function try/except exception handling for and while loops Each specific scenario calls for a different method of checking. For the simplest cases, the in operator is typically used. When the application logic is more complex and requires additional actions, a for or while loop may be employed. If you want to build a web service using Python, you can rent a cloud server at competitive prices with Hostman.
09 January 2025 · 6 min to read

Answers to Your Questions

How secure are cloud databases?

Hostman Cloud Databases emphasize security through advanced measures like encryption, regular security audits, and stringent access controls. Our robust cloud database security ensures that your data is protected against threats and unauthorized access, giving you peace of mind.

What types of databases are supported in your cloud database offering?

Various database types are supported by Hostman Cloud Database, including NoSQL databases like MongoDB and Redis, as well as relational databases like MySQL, PostgreSQL, and many more. You can choose any database for your unique requirements thanks to our flexible platform.

Can I easily scale my database resources in your cloud environment?

Yes, scaling with Hostman Cloud Databases is simple and effortless. Your database resources can be quickly scaled up or down to meet the demands of your workload, guaranteeing peak performance during traffic surges without sacrificing productivity.

What backup and recovery options are available for cloud databases?

Reliable backup and recovery choices are offered by Hostman Cloud Database. Point-in-time recovery, automated backups, and regularly scheduled snapshots guarantee that your data is safe and can be promptly restored in the event of an emergency or breakdown.

How does your pricing model work for cloud databases?

Our cloud database services operate on a pay-as-you-go model. You only pay for the storage and processing power that you actually use.

Is there any downtime during database maintenance?

Hostman Cloud Database's continuous updates and automatic failover reduces downtime during upgrades or maintenance. Even when undergoing maintenance, your databases will continue to be accessible and functional due to our cloud-based database solutions.

Can I migrate my existing databases to your cloud platform?

Absolutely, you may migrate your current databases to Hostman Cloud Database with ease. Transferring databases to our cloud platform with the least amount of downtime and disturbance is made possible by our professional support team and migration tools.

What level of support do you provide for managing and troubleshooting database issues?

For maintaining and resolving database problems, Hostman provides extensive help. To ensure seamless database operations, our technical support staff is accessible around-the-clock to help with any inquiries or issues.

Can I integrate third-party tools or applications with your cloud databases?

Yes, you can quickly connect new resources and services to enhance the usefulness of your database with the aid of our flexible platform.

How do you handle data encryption and data privacy in your cloud database environment?

Hostman uses extensive encryption mechanisms to guarantee data confidentiality and privacy. Securing data ensures compliance with data protection rules and protects it against illegal access, both during transmission and at rest.

What monitoring and performance tuning options are available for cloud databases?

Advanced monitoring and performance optimization features are available with Hostman Cloud Database. Real-time monitoring, performance analysis, and automated alerting tools are all included in our platform, which enables you to maximize database performance and promptly handle any problems.

Take your database
to the next level

Contact us for a personalized consultation. Our team is here
to help you find the perfect solution for your business and
support you every step of the way.
Email us
Hostman's Support